How to Make a Project Read Only Eclipse
Project Explorer view
This view provides a hierarchical view of the artifacts in the Workbench, which is customized by the specific configuration of your Workbench.
From hither, y'all tin can open up files for editing or select resources for operations such as exporting.
A typical Project Explorer with simply the Java Evolution Tools (JDT) installed looks similar to the Bundle Explorer:

Right-click on any resources in the Projection Explorer view to open a pop-up bill of fare that allows you lot to perform operations such every bit copying, moving, creating new resources, comparing resources with each other, or performing team operations. To run across a description of what each menu item does, movement selection highlight to that carte detail and press the context-sensitive help key (e.g., F1 on Microsoft Windows).
By default, the Project Explorer view is included in the Resources perspective. To add the Projection Explorer view to the electric current perspective, click  Window > Show View > Other... > General > Project Explorer .
Toolbar
Collapse All
This command collapses the tree expansion land of all resource in the view.
Link with Editor
This command toggles whether the Project Explorer selection is linked to the active editor. When this choice is selected, changing the active editor will automatically update the Project Explorer selection to the resource being edited.
Select and deselect content to filter to the content in the tree
This control opens a dialog allowing to configure some filters to enable.
View Menus
Click the ⋮ vertical ellipsis to open a menu of items specific to the Project Explorer. Some extra menu entries tin exist added by extension and may not be documented here.
Projection Presentation
Select whether the physically nested projects should exist shown as root elements (Flat), or should be shown under their parent project in place of their respective folder (Hierarchical).
Pinnacle-Level Elements
Select whether the top level-elements should be the selected working sets with projects as children, or the visible projects.
Select Working Set
Opens the Select Working Fix dialog to allow selecting a working set for the Project Explorer.
Deselect Working Set
Deselects the current working set.
Edit Agile Working Prepare
Opens the Edit Working Set dialog to allow changing the current working set.
In improver to these menu items, the Projection Explorer menu shows a listing of recently used working sets that accept been selected in the view.
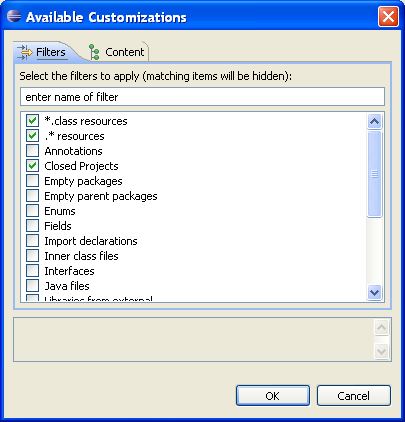
Filters and Customization
This command allows you to change the view for your specific needs. Yous may select pre-defined filters to apply to the view so that you tin can show or hibernate diverse artifacts as needed. The default filters available with the Coffee evolution tools (JDT) is shown below:
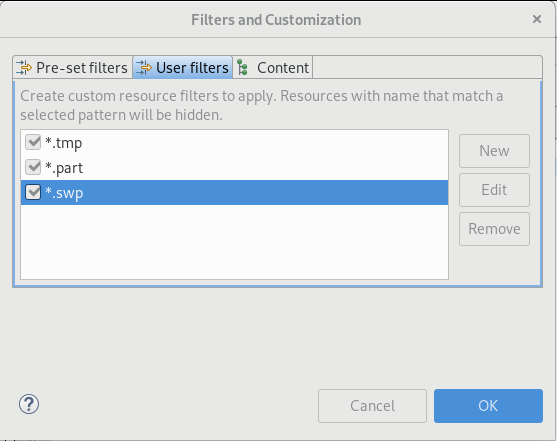
You lot tin can also ascertain your own filters based on the name of a resource. Full name or regular expressions are allowed.
You may also cull the types of content for the view to show as well. The default content extensions available with the Java development tools (JDT) is shown below, but your specific extensions volition be determined by your workbench configuration:

Link with Editor
See the toolbar item clarification above.
Context menu
The context-carte du jour allows to access some general Projection management operations as well every bit operations that are specific to your pick. Some plugins tin can extend the context-carte du jour with additional entries that might not be documented here.
New
This command allows you lot to create a new resource in the Workbench. Select the type of resources to create from the submenu.
Copy
This command copies the selected resource to the clipboard.
Paste
This command pastes resources on the clipboard into the selected project or folder. If a resource is selected the resource on the clipboard are pasted every bit siblings of the selected resource.
Delete
This command deletes the selected resource from the workspace.
Move
This command moves the selected resource to another location. A dialog will appear, prompting for the destination location to which the resources will be moved.
Rename
This control allows you to specify a new proper name for the selected resource.
Import
This command opens the import magician and allows you lot to select resources to import into the Workbench.
Export
This command opens the consign wizard and allows y'all to export resources to an external location.
Refresh
This command refreshes the Workbench's view of the selected resources and its children. For example, this is used when you create a new file for an existing project exterior the Workbench and want the file to appear in the Project Explorer view.
Close Project
The close project command is visible when an open up project is selected. This command closes the selected project.
Close Unrelated Projects
This command will close whatsoever project which are unrelated to the selected projection.
Open up Project
The open projection command is visible when a closed project is selected. This control opens the selected project.
Team
Bill of fare items in the Team sub-menu are related to version command management and are determined by the version control direction system that is associated with the project. Eclipse provides the special carte du jour particular Share Project... for projects that are not under version control direction. This command will present a sorcerer that allows you to choose to share the project with any version command management systems that has been added to Eclipse. Eclipse ships with support for CVS.
Compare With
Commands on the Compare With sub-menu allow you to practice one of the following types of compares:
- Compare ii or three selected resources with each other
- Compare the selected resource with remote versions (if the projection is associated with a version command management organisation).
- Compare the selected resources with a local history land
After you lot select the type of compare you want to do, you will either see a compare editor or a compare dialog. In the compare editor, you can browse and copy diverse changes between the compared resources. In the compare dialog, you lot can just browse through the changes.
Replace With
Commands on the Replace With sub-menu let you to replace the selected resource with another state from the local history. If the project is under version control direction, there may be boosted items supplied past the version command direction system as well.
Properties
This command displays the properties of the selected resource. The kinds of properties that are displayed depend on what type of resource is selected. Resource properties may include (but are not limited to):
- Path relative to the project in which information technology is held
- Blazon of resource
- Accented file organisation path, or name of path variable when using linked resources
- Resolved path variable when using a path variable for a linked resource
- Size of resource
- Last modified date
- Read-only status
- Derived resource status
- Execution arguments, if information technology is an executable resources
- Programme launchers, if it is launchable
- Project dependencies, if any
Team programming with CVS
Three-mode compare
Linked resources Compare editor
Source: https://rtist.hcldoc.com/help/topic/org.eclipse.platform.doc.user/reference/ref-27.htm
0 Response to "How to Make a Project Read Only Eclipse"
Postar um comentário